Monday, 21 November 2011

Improvised jerky (or biltong)


It was only a matter of time before I started trying to dry sliced meat. I was inspired in part by Hugh Fearnley-Whittingstall's book Meat, which I borrowed from my friends. It contains a recipe for bresaola (an Italian cured beef, served thinly-sliced like a continental ham). I saw silverside (a cut of beef we'd usually roast and served sliced in sandwiches, or maybe in a stew, on offer at the local shop, so I got some. But it was far too small for the recipe, so I decided to make jerky.

To be fair, this could just as well be called biltong, or simply dried cured beef. I love that sort of thing, but it is so expensive - a couple of pounds for a tiny packet. It's a fairly guilt-free snack as far as I'm concerned - and this recipe in particular contains no added fat, and the meat isn't very fat to start with. There is a lot of salt and sugar added, but most of that is removed. Nutritional or not, I couldn't find a recipe online that made sense - there were too many proprietary websites - so I decided to improvise.

It worked out so well, I intend to do it again, and I think it's worth posting here. Once again, it can be varied a lot, so I'll include a few ideas along with what I did.

ingredients
  • beef (topside, silverside, brisket - fillet is too fine and expensive, and the meat is tenderised by the process, so these tougher cuts are ideal)
  • salt
  • sugar (I used dark muscovado)
  • spices (optional: I used lots of crushed black pepper)
  • Worcester sauce (optional: I used mushroom ketchup, which is similar)

method
  • If the beef is trussed up, remove the string. You can remove any fat and sinews too, if you like. Wash and pat dry.
  • Put the beef in the freezer for an hour or two - until par-frozen.
  • Slice the meat thinly with a very sharp knife or a meat slicer. Work quickly - it will start to thaw, and this makes the slicing more difficult.
  • Marinate the beef slices. I layered them alternately with salt and sugar, and poured a mixture of more salt and sugar, mushroom ketchup, and freshly-ground black pepper on top. You could use a more liquid marinade, or a dry one. I didn't measure the ingredients - just added enough to cover the meat. Refrigerate for an hour, several hours, or overnight.
  • Rinse and pat dry the meat - it should be slightly coloured if you've used dark sugar, molasses, treacle, or Worcester sauce.
  • Lay the slices on trays, not touching, and put the trays into an oven, at 40-60ºC, or as low as possible, on the fan setting if it has one.
  • Leave them for a long time - at least 6 hours, maybe as long as 24 (depending on the thickness of the slices, and the temperature). When they are dry, leathery, and dark (almost black), they are done - check them, and remove when they are to your liking.
  • Refrigerate or freeze, in a sealed jar or plastic container, or eat immediately. They should keep for at least a week at room temperature, possibly much longer - but remember, they will go off eventually (err on the side of caution).

variations and substitutions
I can think of quite a few possibilities off the top of my head, but if I don't include one, don't be put off - experiment. Try different sugars and sweeteners, like honey, maple syrup, or palm sugar. Lots of spices could be included - chilli, Sichuan pepper, five spice, fennel seeds, coriander, garam masala. I don't know if Worcester sauce (or equivalent) is essential - it does add a sharpness, so maybe try a little vinegar instead. Alcohol might work - bourbon or other whiskeys, or possibly brandy might add interest, or red wine, or maybe ale. The dried slices could be smoked, or if you can cold smoke, you could do that before drying them. You can add more seasoning at the end if they are too bland - but taste first, as any flavouring will have become concentrated as the meat dried.

October harvest: week four/monthly summary

I was waiting to post this when I had a photo to attach, but at this rate it'll never get done, so here's the text-only version.

A quiet end to the month in the garden - but busier than ever indoors. Outside, the weather has been mild, with no sign of frost (we did go down to around 5ºC a couple of weeks ago), alternating sunshine and rain.

The kitchen is taking shape, at last, and just in time - I have been drying tomatoes at just over 50ºC before bottling in oil, which is a job I wanted to do but didn't expect to have the facilities for (i.e. an oven with a low heat setting) before next year. After that, I did apple slices, which I'm filling a large jar with - a great way of using up two bags of fruit that I'd bought reduced and had sitting around for a couple of weeks. They're chewy and intensely sweet and apply - a great snack. I've also commenced a couple of projects that will keep me busy in the absence of daily gardening tasks - I've started curing bacon, using maple syrup, juniper berries, and salt, which I will then smoke, slice, and freeze, and I have a batch of ale (from a kit, as I'm a beginner) bubbling away upstairs. I'll also be making sausages, smoking more food, baking lots of bread, and making yoghurt and cheese, in addition to bottling more fruits and vegetables (mostly bought).

Totals for week 22nd-31st October:
28th: 268g stem lettuce (two plants; I forgot to weight the leaves and stems separately).
30th: 37g carrots, 17g carrot tops, 33g turnip, 71g black radish, 55g chard (day total: 213g)
Total for week: 481g
October total: 11.289kg
Year to date total: 38.372kg

The highlight of the final week of October was pulling the first carrots and black radish, which went with homegrown tomatoes, chard, and turnip in a Tuscan-style bread soup, made with leftover home-baked bread roll chunks (they had stuck to the greaseproof paper I baked them on, so I had to find a use for the tops I salvaged). The carrots were small, but bigger than any I've managed to grow before, and so fragrant - and totally perfect and unblemished. I used the tops as well.

I haven't yet picked the last tomatoes. Dozens of red 'Gardener's delight' are glowing at me from across the garden when I look out the (old) kitchen window, which is quite remarkable, given it's November. I must gather them in soon, however, and get my seed-grown onions out, along with broad beans and peas, to overwinter for an early crop next year.

I have a lot more to do indoors just now, however, so I don't know when I'll get round to it...

Monday, 14 November 2011

Drying fruit

Dried apple slices.

My new oven is great. I've hardly begun to explore its features - in particular, the steam function, which is hard to integrate into existing recipes. But one aspect is already well-tested: low temperature control. It can be held at just under 40ºC, which is ideal for proving bread dough. At 60ºC I can dry fruit and certain meat products (on which more in a future article), and that's what I've been doing. I started with tomatoes, but the most successful thing so far has been apples.

I had a couple of bags of apples that weren't doing anything. I tend to buy fruit when it is reduced in the local shops, or at the greengrocer if there is a good offer on (and this is apple season, so many English varieties are quite cheap). In fact, unless I'm buying for a recipe, almost all the fruit I get is less than full price. The advantage of this is, you can get a lot of fruit for very little money - often half or a third of the retail price. The disadvantage (if you see it that way) is, you end up with a lot of the same thing, and have to find a way of using it. I must admit, sometimes I end up composting some of it (a couple of dozen passion fruit I got for pennies earlier in the year still lie heavy on my conscience). Drying could be the answer.

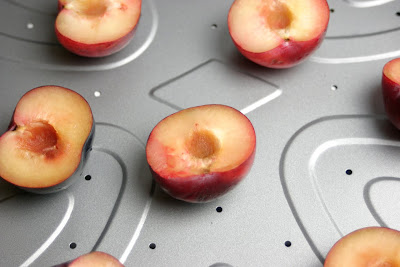
A punnet of red-skinned plums, sliced, stoned, and spread on a tray, ready for drying...

...and here they are, done - they rather unsettlingly resemble mushrooms, but taste fantastic.

Of course, you could make jam. But that requires a ready supply of sugar, possibly pectin, and jars, and can be quite a messy process. Plus, I don't eat much jam. Drying, however, is almost foolproof, and aside from the initial preparation, is a process that needs no supervision. Admittedly, you do need jars or similar for storage, but they don't need to be heatproof, nor do you need to worry about sterilising them. Otherwise, you can freeze the dried fruit in bags, but it's so delicious to snack on, long-term preservation shouldn't be a worry.

For most fruit, the process is the same. You'll need a knife, one or more trays (I bought some new ones with holes in, which will hopefully increase air circulation), an oven capable of being set to a temperature less than 100ºC (the lower the better), with a fan if possible. For fruit that can go brown, you will also need a bowl and some lemon or lime juice (or citric acid).

These apples have been drying for a few hours; they are nearly ready.

The method is simple. Wash and preferably dry your fruit. You can peel it if you like, but I don't. Remove the core of apples, pears, and the like; remove the stone from plums, apricots, nectarines (by slicing in half, and pulling or prising out the stone). For apples, slice evenly - a mandoline is a useful tool, but a sharp knife will do. Incidentally, an apple corer might be helpful if you have a lot of fruit to do (I intend to get one soon). With fruit that can turn brown in air, put it into a bowl with water and lemon juice (or whatever acid you're using). I would simply halve stone fruit. Thicker slices and larger fruit will take longer to dry, of course, but has a more satisfyingly leathery texture at the end. Spread the fruit slices out (grapes, figs, and cherry tomatoes can be left whole, but prick them with a skewer or cocktail stick to allow moisture to escape) on trays, put the trays into the oven. Fan setting, 50-70ºC is perfect. Leave for several hours, or overnight; check once they look shrivelled. Thinner and smaller pieces will dry faster; you may need to remove these first. The longer you leave them, the better they may keep, but the crisper they will be - eventually they will be totally dessicated.

Washed, blanched grapes on a tray...

Storage is easy: pack them loosely into clean jars or resealable plastic storage boxes. Tie a little uncooked rice in a piece of muslin, to make a pouch, put this in the jar. The rice acts as a desiccant, absorbing any excess moisture, and keeping the fruit fresh longer (like silica gel). They should keep weeks or even months, in a cool, dry place, out of sunlight. Check them - discard any that have gone mouldy.

...here they are halfway through - starting to brown and shrivel...

Eat them as a snack, or sprinkle into cereal, or maybe use them in baking (I'm not sure what recipes you could use dried apples in, but they're so delicious, I'm unlikely to find out!).

...and these have nearly finished their transformation into sultanas.