Monday, 14 November 2011
Drying fruit
My new oven is great. I've hardly begun to explore its features - in particular, the steam function, which is hard to integrate into existing recipes. But one aspect is already well-tested: low temperature control. It can be held at just under 40ºC, which is ideal for proving bread dough. At 60ºC I can dry fruit and certain meat products (on which more in a future article), and that's what I've been doing. I started with tomatoes, but the most successful thing so far has been apples.
I had a couple of bags of apples that weren't doing anything. I tend to buy fruit when it is reduced in the local shops, or at the greengrocer if there is a good offer on (and this is apple season, so many English varieties are quite cheap). In fact, unless I'm buying for a recipe, almost all the fruit I get is less than full price. The advantage of this is, you can get a lot of fruit for very little money - often half or a third of the retail price. The disadvantage (if you see it that way) is, you end up with a lot of the same thing, and have to find a way of using it. I must admit, sometimes I end up composting some of it (a couple of dozen passion fruit I got for pennies earlier in the year still lie heavy on my conscience). Drying could be the answer.
Of course, you could make jam. But that requires a ready supply of sugar, possibly pectin, and jars, and can be quite a messy process. Plus, I don't eat much jam. Drying, however, is almost foolproof, and aside from the initial preparation, is a process that needs no supervision. Admittedly, you do need jars or similar for storage, but they don't need to be heatproof, nor do you need to worry about sterilising them. Otherwise, you can freeze the dried fruit in bags, but it's so delicious to snack on, long-term preservation shouldn't be a worry.
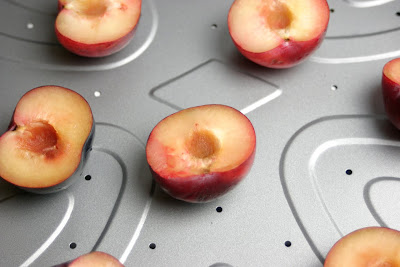
For most fruit, the process is the same. You'll need a knife, one or more trays (I bought some new ones with holes in, which will hopefully increase air circulation), an oven capable of being set to a temperature less than 100ºC (the lower the better), with a fan if possible. For fruit that can go brown, you will also need a bowl and some lemon or lime juice (or citric acid).
The method is simple. Wash and preferably dry your fruit. You can peel it if you like, but I don't. Remove the core of apples, pears, and the like; remove the stone from plums, apricots, nectarines (by slicing in half, and pulling or prising out the stone). For apples, slice evenly - a mandoline is a useful tool, but a sharp knife will do. Incidentally, an apple corer might be helpful if you have a lot of fruit to do (I intend to get one soon). With fruit that can turn brown in air, put it into a bowl with water and lemon juice (or whatever acid you're using). I would simply halve stone fruit. Thicker slices and larger fruit will take longer to dry, of course, but has a more satisfyingly leathery texture at the end. Spread the fruit slices out (grapes, figs, and cherry tomatoes can be left whole, but prick them with a skewer or cocktail stick to allow moisture to escape) on trays, put the trays into the oven. Fan setting, 50-70ºC is perfect. Leave for several hours, or overnight; check once they look shrivelled. Thinner and smaller pieces will dry faster; you may need to remove these first. The longer you leave them, the better they may keep, but the crisper they will be - eventually they will be totally dessicated.
Storage is easy: pack them loosely into clean jars or resealable plastic storage boxes. Tie a little uncooked rice in a piece of muslin, to make a pouch, put this in the jar. The rice acts as a desiccant, absorbing any excess moisture, and keeping the fruit fresh longer (like silica gel). They should keep weeks or even months, in a cool, dry place, out of sunlight. Check them - discard any that have gone mouldy.
Eat them as a snack, or sprinkle into cereal, or maybe use them in baking (I'm not sure what recipes you could use dried apples in, but they're so delicious, I'm unlikely to find out!).
Subscribe to:
Post Comments (Atom)


1 comment:
Your post is very helpful, thank you. The practice of drying fruit dates back thousands of years and the first documented cases date back to around 1700BC. Seeing as though it has continued to enjoy success over the years, there much be some reason behind this form of food preservation. See more http://survival-mastery.com/diy/food_preserv/how-to-dry-fruit.html
Post a Comment