Monday, 2 April 2012

The "allotment" three weeks in

Green pak choi.

Has it only been three weeks? It seems a lot more, especially seeing how much my friends' garden has come on. I hadn't been for a fortnight, in fact, because I was too busy at home. But yesterday was the last of a long line of unseasonably warm, sunny days, so I headed over to see what was afoot.

Aside from helping to paint a fence (that will hopefully be clad in sweet peas this summer), I checked on the progress of the seeds we'd sown, and took a few photographs.

The most pleasing sight was seeing the outdoor seedlings had germinated. Two rows each of spinach 'Medania', beetroot 'Boltardy', and carrots 'Amsterdam 3 - sprint' were all visible, the spinach quite large and the carrots tiny. I thinned the first two, leaving about 50% - further thinning will take place in a few weeks, as the plants get bigger. The carrots I left, partly because they were so small, and partly to avoid releasing any scent that might attract carrot root fly. The catch-crop radishes I sowed a few days after the main crops here were showing no signs of life - but they were old seeds.

Spinach after their first thinning.

The tray of pak choi I sowed just over two weeks ago was full of large seedlings, already getting their true leaves. The difference in colour between the two varieties, 'Green boy' (green) and 'Santoh' (yellow) was apparent. I spent a pleasant 10 minutes thinning these to around half their number too. I had sown them thickly, not knowing how good the germination would be, but even so, we will have far more than we need - which is never a bad thing.

Yellow pak choi - compare their colour to the green, above.

A few things in the greenhouse looked forlorn, because of the recent heatwave. Some radishes 'White icicle' had been scorched, and the onions were dry - but they should come to no harm. They were ready for planting out, so I soaked them, then packed the fourth quarter of the first raised bed with as many as I could, and the rest went into the second, shadier bed. I planted them close, since we don't have endless space - perhaps too close, but I'll see they are well fed and watered. Whether they sulk in the shadier, east-facing bed, remains to be seen. Altogether, there were over 40 plants.

Onions in their new home, under protective netting.

Elsewhere, two trays of mixed salad leaves aren't far off their first harvest trim, and a tray of mispoona (a mizuna-like oriental leaf) sowed a few days later is also lush with growth. The basil and sweet peas are germinating, but small. A period of much cooler weather is upon us, so hopefully the greenhouse plants will get some respite - but it's been a foretaste of the potential heat of the summer (in the greenhouse at least), so perhaps a drip-watering system will be worth setting up after all.

Mixed salad.

Thursday, 15 March 2012

The time is now

The first garlic is sprouting. The pale brown is blood-, fish- and bonemeal which I sprinkled.

Although in practice, growing and cooking takes place throughout the year (especially if you have a greenhouse or polytunnel, and a level of self-discipline), I tend to think of there being two pivotal times - almost six months apart. August-September is the high season for harvests - most things are ripening then. We are now entering the other - March-April is when the vast majority of crops are (or at least can) be sown, when the first hardy vegetables and flowers are planted outside, and when the natural world provides a great range of wild foods to make up for the garden's dearth (on which more in a future post).

Organisation is paramount. Every day's work now is worth a week later, or there abouts. The lengthening daylight, increasing air and soil temperatures, slightly lower rainfall than autumn and winter, and the end of the frosts* all encourage seeds to sprout fast, and grow well. That means both that you need a lot of pots and compost, trays and windowsill or greenhouse space to fit your sowings, and time and energy to fight the weeds - because they will respond to the improving conditions even better. Clearing brambles now, just as they are coming into bud, is a lot easier than in a couple of months, when their new growth may be half a metre long and they are covered in leaves. Hoeing soil encourages weeds to germinate, and re-hoeing when they have done so will destroy them and reduce the problem considerably - though weeds tend to have seeds that vary a lot in how long they are dormant, and how responsive to disturbance, another reason they are so persistent, so it won't eradicate them entirely.

On that note, I am tackling both sides at the moment. I'm trying to sow a few crops every day or two, which makes it seem a lot less work, and sets up a conveyor belt, with the larger plants able to move from the germination station (a bright daylight lamp by the fire) and onto the windowsills or outside. Three days ago I sowed scorzonera 'Duplex' (a black root vegetable), herb (as opposed to bulb) fennel, namenia (a leafy salad crop), green perilla, and broccoli 'Autumn green calabrese'. The next priority is other herbs - especially basil, parsley, chervil, sage, thyme - lettuces, onions, and annual flowers.

The first six purple-podded peas. Some are looking a bit sad.

Outside, I've started hardening off the first legumes I started soaking 6 weeks ago. They went from indoors proper (warm), to a cool spot by the front door for a couple of days, to the front step, which is sheltered but at the ambient outdoor temperature. They've thrived, and the first six purple-podded peas went into the front garden earlier this week. The broad beans - six 'Aquadulce longpod' and around 8 of an unknown variety that I bought as dried pulses from a local shop, are around 30cm tall, and will go in soon. Potatoes, which have sprouted nicely ('Red Duke of York' I think, though I've misplaced the label) have been put into four large planting bags - two tubers each. Plants I don't want - like red valerian (Centranthus ruber), which I like but find rather invasive; couch grass; dandelions and the like - are just sprouting, and have been fairly easily removed (though they will return).

The grow bags I grew most of my tomatoes in last year are spent, but they will be useful as a soil conditioner and mulch - they are largely free of weed seeds, and full of worms, and although most of their nutrients will have been exhausted, they raise the soil level, lighten its texture, and I am adding nutrition back in by sprinkling blood, fish, and bonemeal, and adding homemade compost.

There's a fair amount of sorting and shifting to do. The two raised beds I built last year became infested with couch grass despite weed-suppressant fabric underneath - the grass just pushed through. I've removed the soil, added a second layer of fabric, and fresh compost. The old soil will be thoroughly sieved and likely rested somewhere for a few months, to prevent the spread of this most pernicious weed (if it resprouts, I'll attack it until it's too weakened to return). I've enough materials for one more bed, and enough room for another, albeit odd-shaped one in the front - that gives me enough space for some peas and beans, garlic, and chard, with gaps around for perennials and ornamentals - rosemary, lavender, alliums, and later marigolds, nasturtium, and cosmos.

Yesterday, I started on the back garden. It's been hanging over me, but once I scouted round I thought about it, I realised the situation is quite manageable. I cleared out the fire pit/barbecue, and lit it, as I've lots of prunings and dry material that is best burned. Over a few hours, I disposed of lots of buddleia, raspberry, privet, brambles, grass, tomato plants, and calendula - all essentially brushwood - and the old willow hurdles that surrounded two large planters, that after two years have become too brittle to keep. They all burned well, and will provide nice sweet ash for nourishing fruit plants and root vegetables in particular.

These sturdy bags have been part filled with compost, and planted with two chitted seed potatoes each. I'll top them up with more compost as they grow. There are four altogether, and I may get a few more yet.

I gathered intact plastic pots and trays, that had blown hither and thither, for cleaning and reuse. Plastic waste (mostly pop bottles and plastic cups used in last year's sowing and watering) can be recycled. Other stuff will be thrown away (polystyrene, plastic bags that have blown in, that sort of thing). Pernicious weeds will go to municipal composting, benign stuff will be rotted down here. After that, a bit of sweeping and pruning, and I can set to fixing the broken greenhouses, relaying the terrace, painting, and the like. A fair amount of work, but nothing I've not done before.

Incidentally, a great deal has survived the winter - tulips, lemon balm, even a tray of mixed salad leaves. And life is returning - birds, ladybirds and seedlings abound (mostly unwanted in the latter case). Spring is a good time.

*Admittedly I am writing this from the perspective of my own garden. Here by the sea, there are few frosts in April (none last year) and almost none in May - although traditional gardening wisdom cautions they may occur as late as June, in my experience this is almost unheard of, especially nowadays.

Sunday, 11 March 2012

In lieu of an allotment

It's definitely spring - the frogs are swarming through my friends' (and their neighbours') garden, and there's plenty of spawn. Frogs can be startling when disturbed, but are useful for keeping down numbers of slugs and snails.

Last October, the waiting list for the allotment site I visited in August stood with person #19 at the top - I am #45. As of just now, nothing has changed. That's pretty galling - that there has been no movement in nearly half a year. I don't expect to be around here for long enough to get even close to the top of the list - which is a shame, because the site is really lovely.

But a couple of years ago, before I ever considered such a formal move, I had another idea. My friend, who I helped with tomatoes last summer, has a large (classic, metal-framed, glass) greenhouse, and a long garden, in which she and her fiancé have started carving a garden - including raised beds. It crossed my mind I could make use of some of the space - they like the idea of a garden, but are very busy and not totally sure about what to do. But I pushed it from my mind - they live far enough away that I might not have been assiduous in visiting, and a garden needs discipline. And last year, they made some effort of their own accord - I gave them plants, and a little advice, but let them see how it went for themselves.

However, I decided to make my suggestion a week ago, partly because I know they had an imperfect time last summer. It was a bad year for tomatoes, and although their chillies and runner beans thrived, I don't think they felt terribly spurred on by the experience. Surprisingly, they were very keen, so I've effectively doubled my planting space. So here's the plan:

I sent them a list of the seeds I have. They picked what they most wanted to grow and eat. That's the core of the planting - because it's their space, and because it will hopefully encourage them if they can pick what they enjoy eating. Most of what they wanted can go in now - beetroot, spinach, carrots, onions, salad leaves, radishes - and the rest (such as squash) can follow on in two or three months. The idea occurred that, in the time before the tomatoes and peppers go in their final positions (we have both sown some, and can share plants and varieties, in case either of us suffers unexpected setbacks), I can sow some pots of spinach, carrots, and beetroot in the greenhouse to get a faster crop - perhaps a couple of weeks to a month earlier than the outdoor crops.

I went over today, to check out the space (it's been a few months), and get started. We made excellent progress - all the crops were sown, except the 'forced' roots and leaves, which I'll set to next weekend. We also got in some sweet peas, basil, and yet another variety of tomato, seeds of which my friend had lying around. I had bought some onion sets last week, and those went into modules to start off, ready for planting outdoors in a week or two. I also helped clear some of the perennial weeds.

Fresh sowings. In a week, the first shoots should have emerged - even on a resolutely cloudy day like today, the greenhouse was much warmer than outdoors.

The raised bed. My friends may build more, but for now, this is the centre of outdoor planting. We divided it into four, sowing three sections with two rows each of carrots 'Amsterdam 3 sprint', spinach 'Medania', and beetroot 'Boltardy'; the fourth will be planted with onions.

At the centre here is a bed of blackcurrants - they give a crop every year, but are swamped by brambles and what my friend describes as 'grass', although I suspect it may be a member of the lily family. [Edit: it's actually pendulous sedge Carex pendula, a native British plant related to grasses].

After a concerted attack with a sturdy knife and secateurs, I've made some headway - I'll continue on my next visit.

Having a second garden to tend to has already encouraged me to do some work in mine - I'm hoping I'll learn a bit of discipline this year, something I could use a lot more of.

Saturday, 18 February 2012

New life

I mustn't let things slip here too much - I have a backlog of articles again! To keep things ticking over, this is a quick photographic update on my seedlings.

When chillies, aubergines, and tomatoes germinate, they emerge as a little thread like this, straightening out after a few days.

These are chilli seedlings.

I tend to pre-soak large seeds, like sweetcorn, peas, and beans. It's useful for older seeds especially, allowing you to see which are viable and which are dead. These have been neglected though - their main root has withered, but they should recover.

After a couple of days, the peas (in this case, purple-podded) begin to grow towards the light.

The broad beans are treated likewise. This is 'Aquadulce longpod', a robust green-seeded variety.

Tuesday, 17 January 2012

Triple cherry smoked fruit beer / My cherry trees

The grain bill (see recipe below).

I have a bit of malt left over from my first major brewing project, and I've been playing around with an online calculator to decide what to do with it.

I've also been enjoying a great blog on the subject of brewing unusual beers (and other food subjects), which inspired me to be a bit more adventurous - although there is something to be said about starting with simple recipes and working your way up, I tend to make what sounds interesting, even if that steepens the learning curve.

I have a thing for smoked beers - at least in theory. I have only tried one, on one occasion (the classic Schlenkerla Rauchbier, at my favourite Mancunian bar, Font). It sure was smoky, which isn't something you'd want in every drink, but it was interesting and not unpleasant. The way smoked beers are made is by smoking some of the malt, often over beech - although any wood you use for smoking food could work. You can buy ready-smoked malt, but since this recipe is made from leftovers, I'm going to smoke my own, using some of the many wood chips I bought last year for barbecues and smoking homemade bacon and suchlike.

I also love fruit beers, especially the two classics, kriek (cherry) and framboise (raspberry). I grow both in my garden - last year I got a single cherry and more than seven kilos of raspberries, but I wasn't brewing, so I used them in other things. I veer towards kriek partly because cherries seem much more luxurious, and partly because those I've had tend to be a little more sophisticated than other fruit beers. It happens that I have a bag of cherry wood chips, so I thought - why not combine the two? I came up with:

Triple cherry smoked fruit beer
for 4.5 litres (one demijohn)
grains and sugars
690g Maris Otter
280g English crystal
150g Amber, smoked over cherry wood chips
100g unrefined cane sugar
70g rolled oats
hops
2g Warrior (18.2% AA)
yeast
Hefeweizen (an unfiltered German beer, I poured some into a jug, added water and sugar, and let the yeast grow)/Wyeast Ringwood*
extras
toasted cherry wood chips
cherries

method
I'll mash the grains in the same way as for my first beer - namely by putting them into a big pan with water (I set my variable kettle to 80ÂşC, which comes down to the right range, 60-65ÂşC when mixed with the cold malt), then put that in the oven at a little under 70ÂşC for an hour. I'll boil with the hops for just half an hour - to extract the level of bitterness I've calculated, which should be pretty low, as what I've read suggests high hop levels and fruit don't combine well. I'll ferment in a glass demijohn with an airlock, and when it's done, I'll transfer to another demijohn, and add the wood chips. When the cherries are ripe, around midsummer, I'll transfer again, adding the fruit and probably removing the wood, depending on how woody it's become. The beer will sit on the fruit until autumn sometime, then I'll bottle it. The total time will be at least 9 months.

I really hope that I can use homegrown cherries in this - my schedule is based roughly around when they're ready. I can't count on having enough, or even any - as I'll explain below. In any case, that gives it five months or so on the wood chips - although I'll check to make sure it doesn't become unpleasant-tasting. Otherwise, I'll buy some fresh cherries around midsummer, and add those. As for quantities, I have no idea - but probably 20-30g of wood chips, and 0.5-1kg fruit.

What it ends up tasting like is unknown - I've never had anything like this, and it's rather experimental. But I'm using stuff I already have, so it's not costing me anything. If it's good, I'll have created something really exciting. If not - I now know you can blend beers, so maybe it won't have to be poured away.

*The Hefeweizen showed no signs of activity after a few days, so I added a little of my previous batch of beer, which is fermenting with Ringwood. Hopefully it'll take off soon. Update 25/1 - it's taken off now, bubbling contentedly (but not violently).

Update: 3rd February 2012
Fermentation has finished after ten days. The beer has been transferred to a fresh sterilised demijohn, and 35g toasted cherry wood chips will be added. Gravity measured at 1.015, giving a current abv of over 6% (the accuracy of a hydrometer is not really good enough to give fractions of a percent). Almost no sediment was transferred - a clean racking. Tasting of 80ml used for measuring the gravity: thick body, very little carbonation left. Copper-orange, good taste - I've had many worse beers in the pub. But there's no detectable smoke taste.

My cherry trees
I love fruit trees. They are amongst the most ornamental plants, with gorgeous (often scented) blossom announcing spring, summer verdancy and swelling fruits, edible baubles at harvest time, then bright autumn foliage. They don't need to take up much space - either get a dwarfing variety, or prune them into step-overs, cordons, fans, etc.

Even in my tiny garden, I've squeezed two cherry trees (and a quince). The cherries were from Tesco of all places, and bought on a whim - but I've always hankered after an orchard, so it wasn't unprecedented (I also bought a plum, but it didn't survive). I put one against the fence at the back of the garden - a position in full sun year-round, which gets very warm in spring and summer; the other went in on the other side of the terrace, about twenty feet away, and was left freestanding. I pruned the fence tree into a fan shape, which was held in place with canes. Perhaps because it has been constrained, the branches have grown much longer than the other tree - or perhaps it's the position, or variety.

Freshly-planted in spring 2009, the future fan-trained cherry had just three or four flowers - but put on strong growth through the summer.

In the second year, I added a framework of canes to train the branches into a fan shape. Plenty of blossom, but no fruit.

At the start of its third year, the fan shape was well established - it measured around 7 feet tall by 8 feet wide.

There was plenty of blossom in the spring of 2011, but just a single fruit ripened - most dropped, and the rest were probably eaten by birds (this year I'll put up a net).

At the end of last autumn, the leaves showed off some lovely colours - peach, orange, and gold.

2012 is a make-or-break year for these trees - I expect a harvest, even if it's only a couple of cups. If not, I will assume something is wrong, and try to fix it.

Monday, 9 January 2012

Brewing my first all-grain beer

Crushed Maris Otter malt.

I made my first beer in November. I initially toyed with the idea last spring, reading about the process, and drawing up a list of preferred styles. But then I ordered my camera, and decided I couldn't afford both. I started with a kit instead, albeit a good-quality one, and was pleased with the results. I didn't quite follow the standard practice, in fact - I performed both fermentations in the same container, a pressure barrel, since I didn't want to pay for a separate fermenter at the time. I transferred the beer into sanitised buckets, before returning it to the barrel for the second fermentation after I'd cleaned it. The result, from Woodforde's Norfolk Wherry kit, was good - red-brown, fruity, smoothly carbonated, and very drinkable. Whether it was strong I can't say - I didn't measure the relative densities, but I didn't get particularly drunk even after several pints, so maybe it didn't ferment all the way. Nonetheless, it was a good enough experience to persuade me to revive my original plans, so once Christmas was out of the way, I set to finding a recipe, and giving it a name.

There are thousands of recipes online, and for a beginner it is very hard to determine which is best, and what the differences are. I found one that sounded interesting, then tried to obtain the ingredients. Since it was an American recipe, I had to make one or two substitutions, which means this will be effectively unique, and so I feel I can give it my own name.

The original recipe can be found here. It's an unusual hybrid that combines "the color of an American Brown, the caramel notes of a Scotch Ale, and the hopping regiment of an India Pale Ale", according to the brewer. I had particular difficulty sourcing the hops, and decided to reduce the bitterness a little, as I prefer a slightly sweeter brew.

Here's the recipe. It's converted to metric, which will be easier for me to measure with the equipment I have:

Old Margery's Winter Ale
20.8 litres (a little over 36.5 UK pints)
grain bill
5.443kg Maris Otter malt
340g amber malt
227g English crystal malt
227g chocolate malt
155g light brown sugar*
72g white sugar*
57g roasted unmalted barley
hops
28g Warrior (a very high alpha acid US hop)
14+28g Admiral (a substitution for the Vanguard that was unavailable)
yeast
Wyeast Ringwood Ale (1187)

*I needed dark brown sugar, but couldn't get any wherever I looked in my town - so I used what I had.

Crushed amber malt.

method: in theory
The Warrior and 14g Admiral hops will be boiled for 60 and 20 minutes respectively, the remainder being added to the hot wort post-boil. The method I'm going to use for mashing is intended to require as little specialist equipment as possible, so might sound rather unorthodox, but I'm hoping it won't ruin the finished beer. I'll use my stock pot, which I'll pop into the new oven, which can hold a good temperature, between 60 and 70 C (I'll see if I can fine-tune it further). I'll strain it using a chinois and muslin, which seems more manageable than the usual homebrew techniques, especially given my lack of a second large container. If I need to cool the wort, I'll just plunge the pan into a sink of iced water - again, I'm not investing in anything more fancy until I am better acquainted with the process.
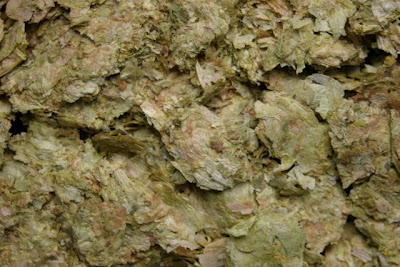
Dried Warrior hops. They're flattened because they were vacuum-packed; when rehydrated, they look similar to fresh hop cones. They smell wonderful - the closest I can think of is juniper berries.

method: what happened
So it took much longer than I was expecting, precisely because the capacity of my pan was much less than I thought. I mean, I knew what it was, but the grain swells up, and you sparge (rinse) it with lots more water than I realised, so I ended up doing a continuous multi-batch process, with one smaller pan in the oven (which held the correct temperature well), and the larger stockpot boiling the wort with the hops. It took from 5pm to 1am the first day, which was about half the total, then I restarted 1pm the next day, finishing mid-evening. Luckily, I found it enjoyable, not too stressful, although it did make the most awful mess of anything I've ever done in the kitchen (think sticky brown liquid spilled on the floors, hob, worktops, and lots of washing up). Sadly I broke the new hydrometer I bought, by dropping a mortar on it (I was using the granite mortar to weigh down the grain and extract as much liquid as possible). I've tried weighing the wort to see what the gravity is (in order to work out how much sugar was extracted, and how alcoholic the finished beer will be), but it will be inaccurate. Incidentally, I didn't bother with muslin - it wasn't necessary.

Freshly-boiled wort, before straining into the fermentation vessel.

Using the excellent brew calculator at Beer Calculus, I've determined it should be 6.4% abv, with a bitterness of 47.6 IBU (so fairly bitter), and dark brown to black in colour: a good hearty brew for winter. I've saved a lot of beer bottles, because I don't want it hanging around in the keg for too long, since I may want to do another batch of something fairly soon, and hopefully it will keep longer in bottles.

Update: fermentation
I was worried that the yeast was dead. It comes in a large sachet, that you strike to break an internal pack, and then it's meant to swell up. Well, mine didn't, not even by the next day. So I poured it into a sterilised jug, with some boiled wort and a little sugar. The following day (when I was ready to add it to the main batch, there was still no sign of life. I added it anyway, but contacted the shop who'd sold it to me. They didn't seem concerned, but were very helpful.

The following day, there was a hiss on opening the barrel lid - something was happening. The day after, it had taken off. Indeed, it was such a violent fermentation that I couldn't fully unscrew the lid for a whole day. I researched the yeast online, and found it was often slow to start, but also that it needed high oxygen levels - and that professional brewers use open fermentation vessels to provide that. Once the pressure died down, I left the lid on, but unscrewed, and regularly swilled the liquid around, to reoxygenate it, and prevent too much carbon dioxide buildup.

After around ten days, the fermentation has died down, and I'll set to bottling it in the next week (this yeast produces a lot of diacetyl, a chemical that smells of butter, so it is recommended to rest the beer after fermentation, to allow that to dissipate - buttery notes may be welcome in certain white wines, but apparently hardly ever in beer).

Update 1st February 2012:
I haven't got round to bottling the beer yet, for the simple reason I can't afford to buy a bottle capper yet. It should come to no harm in the sealed fermentation vessel - and some of the buttery notes the yeast has produced will die down. I measured the final gravity as 1.010, which means the alcohol by volume is around 6.7% - slightly stronger than originally predicted. It's rich, complex, bittersweet, and not terribly drinkable just yet.

Chillies: the plan

I've written at length on the many tomatoes I've grown and will be growing, but this year there are other plans (and plants). Chillies are something I've had mixed experiences with in the past; shop-bought plants often thrive, even outdoors - so long as they get lots of sunshine and adequate watering. In fact, you treat them rather like their close relatives tomatoes (and aubergines), in that they are hungry, thirsty, heat-loving plants, but they seem less prone to disease. From seed, however, I've never succeeded, in part because I haven't been careful enough. Last year I concentrated on tomatoes to the detriment of their kin, which I left lingering as seedlings until they gave up, so this time I'm sowing them earlier - also because chillies seem to be much slower to germinate and grow.

There are many advantages to growing chillies. The plants are small, tending to grow to a fixed size, small bushes at most. This means they need no pruning and little support. The fruits aren't juicy, so they need less water and cope better with drought. Many of their fruits are small, but intensely-flavoured, so you can easily grow enough for your needs - whereas self-sufficiency in most crops is beyond the home grower with an small garden, it's not at all unrealistic in this case. Finally, they can be overwintered - at the very least, the fruits will keep well on the plant, even if it dies, and you might get a second flush the following year (in fact, all these plants are perennials in their homeland).

So here are the varieties I'm going to try. Apologies for poor-quality photos; there aren't many available. The heat ratings (﹆﹆﹆, ﹅﹆﹆, ﹅﹅﹆, ﹅﹅﹅ for no heat, mild, medium, and hot respectively) and other info are from The Chileman, an excellent online resource on the subject:

Black Hungarian ﹅﹅﹆

photo: conalloughry

Attractive Hungarian heirloom variety, with red-to-deepest-purple fruits, and purple flowers. Good flavour.

Chocolate beauty ﹆﹆﹆

photo: Gelatobaby

A dark bell pepper, no heat. An F1 (breaking my normal rules, but I didn't know this when I bought the seeds) with deep-red-to-dark-brown, large fruits.

Corno di toro rosso ﹆﹆﹆


Long, often curved, horn-shaped sweet fruits from Italy. Like the long bell peppers sold in supermarkets, I'm hoping, perfect for stuffing with goat cheese.

Costeno amarillo ﹅﹅﹆


Medium-sized, narrow golden fruits, thin-fleshed with complex aroma, used in yellow mole (Mexican chilli) stews.

Habanero mustard ﹅﹅﹅+


Rare; peach-coloured, warped, blunt fruits, extremely hot.

Hungarian yellow wax ﹅﹅﹆


Long, pointed, Hungarian variety, ripening to orange or red, but harvested unripe when pale yellow-green. Good for pickling.

Onza ﹅﹅﹆?


Could be one of two varieties, either Mexican or Italian (I think it more likely I'm growing the Mexican one). Either way, little information is available.

Red cherry ﹅﹆﹆

photo: Scott Hamlin

A number of similar varieties exist; probably mild, small, round, red fruits. Varying heat. Good for pickling or stuffing with cheese.

I'll post an update once they've started growing.